How to use Bitbucket Org with Git Bash tool to maintaining the
code into repositories.
Guys here I have demonstrate the use of bitbucket with bitbash tool to maintain our code into repository where multiple developers works on same project and easily share individual work.
It is very useful to save our project work into the Repository because once project work is deployed into the production then Developers don't have any access.
It might be possible in some scenario you would need same piece of code but you don't have access so again you need to rewrite the code. But with use Bitbucket Code Repository you can access your work & gets the code.
So first of all you have to create your account into the bitbucket link is given below:
https://bitbucket.org
Step 1: On the
Dashboard of bitbucket click on the Repository option to create a new Repository
where you maintain your project.

Step 2: Configure the
Repository by add name, making access level private & fill the basic
information as shown on the below image:

Step 3: Once you save
the Repository it will redirect to Clone Repository then "Click on Clone" button.

Step 4: Basic configuration on bitbucket is completed Now
we have to access our repository on our PC. All the major IDE (Interacted
Development Environment where we write a code) like Visual Studio for DOT Net
Developers, NetBeans for JAVA has supports Bitbucket Code repositories.
Or if you don't want to use IDE then we can use command base tool called Bitbash to access our repository. The key feature are
mention below:
1.
Add: For
Adding the Project & files.
2.
Commit:
To finalized the changes on project.
3.
Pull:
Gets the updated code from Repository.
4.
Push:
Send the code into the Repository.
Download Bitbash tool
from this link https://git-scm.com/download/win
Step 5: After
Installation Click it & this screen will appears

Step6: Now we have to
paste the Clone (url of Repository) and will ask for the Bitbucket Repository
Credentials once it authenticates then it will download the Repository on our
PC.

Step7: Now go to “C:\Users\”
folder location where you will find the project repository folder is already
created. Now put your project files & folder into repository.
Step8: Now in the Bitbash
command prompt use “cd” command to locate our repository folder.
Syntax : cd <Project Name>

Step9: (ADD) Now once you added the Project files/folder into the Repository folder then run "add command" on bitbash command prompt.
Syntax : git add .

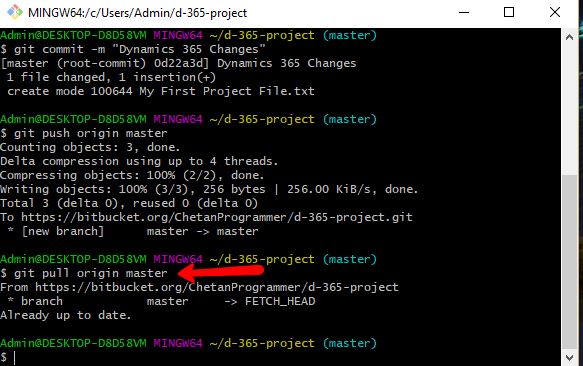
Step10: (COMMIT) Run "Commit" command to save changes into the repository.
Syntax : git commit -m "comments"

Step10: (PUSH) Once you done with changes & commit then Push all the code into the bitbucket target repository.
Syntax : git push origin master

As you see on the bitbucket repository folder our changes has reflected (see below image)

Step 11: (PULL) To get the latest code from bitbucket.
Syntax : git pull origin master
Bit commands in
details
1. cd project Folder
Name : Go to the Folder
2. git pull origin
master : Get latest code from server
3. git add . : Add New/Updates changes into the project
4. git commit -m
"comments”: Commit those changes
5. git push origin
master : Push your changes to the server
--END--
Comments
Post a Comment